Overview
The Stressing Calculations screen (Figure 2) is where you can add and edit stressing calculations and generate tensioning records for production beds.
Required Configuration / Setup
Before the Stressing Calculations screen can be used, data must be entered in the following screens. All screens can be found in Configuration > Production Setup from the main menu.
Accessing Stressing Calculations
Navigate to Production > Stressing Calculations from the main menu (Figure 1).
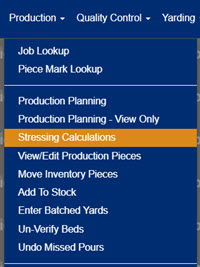
Figure 1
Understanding the Stressing Calculations Screen
The Stressing Calculations screen (Figure 2) displays:
- Date: Cast date for the bed
- Bed ID: Identifying number assigned to bed
- Bed Name: Name of bed
- Loc: Plant location
- Total Pieces: Quantity of pieces scheduled on the bed
- Strand: Strand type used in stressing calculations
- Count: Quantity of strand types used in stressing calculations
- Reports: Quantity of stressing calculation reports generated
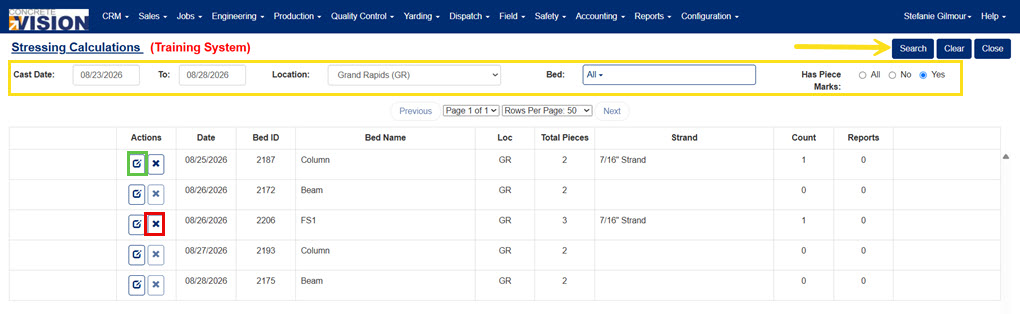
Figure 2
Filtering the Stressing Calculations Table
The scheduled production beds displayed in the Stressing Calculations table can be filtered. From the Stressing Calculations screen (Figure 2):
- Select variables for cast date span, plant location, bed, and if the bed has piece marks (yellow box in Figure 2).
- Click the Search button (yellow arrow in Figure 2).
Add a Stressing Calculation for a Bed
From the Stressing Calculations screen (Figure 2):
- Click the Edit icon (green box in Figure 2) of the bed to run stressing calculations on. A pop up will display (Figure 3).
- Select which stressing calculation record to use.
- Select the strand type(s) to use.
- Click the Save button. The popup will close and a Stressing Calculations details screen will display (Figure 4).
- Enter all stressing calculation values, filling in fields and selecting options from dropdowns.
- Click the Save button (red box Figure 4) to save and remain on the same screen or the Save & Close button (red box in Figure 4) to save and return to the previous screen.
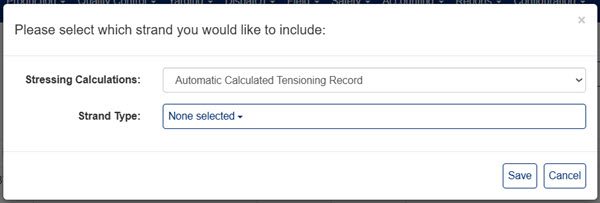
Figure 3
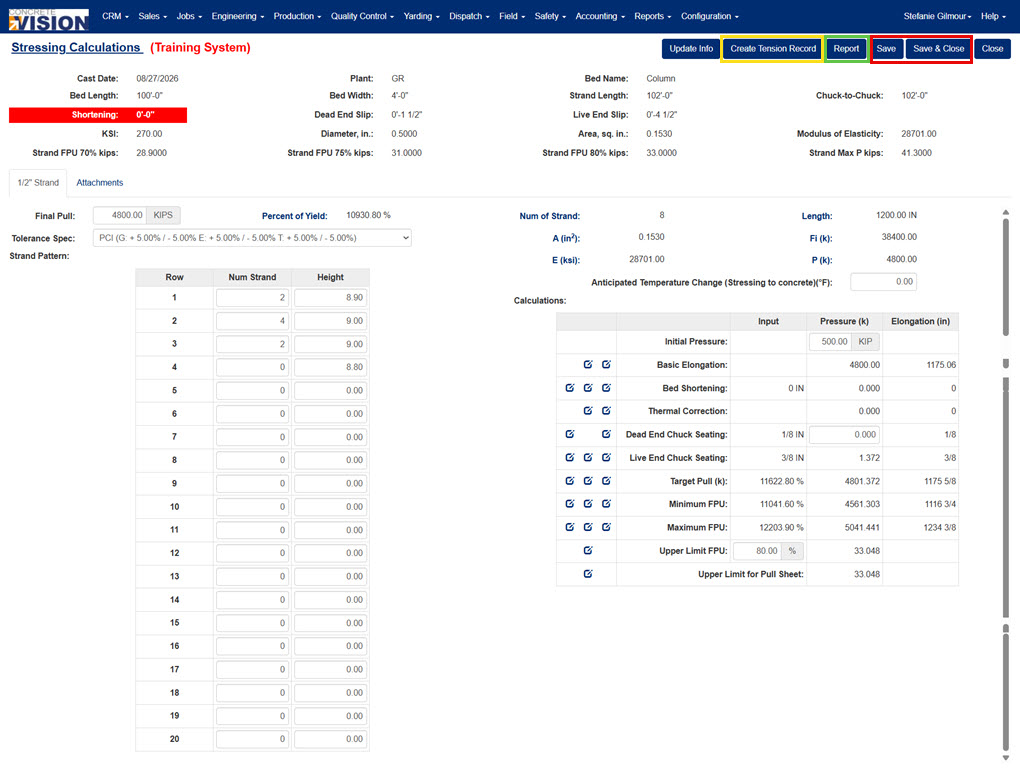
Figure 4
Delete a Stressing Calculation for a Bed
From the Stressing Calculations screen (Figure 2):
- Click the Delete icon (red box in Figure 2) of the bed to remove the stressing calculations.
- A green success message will appear at the top of the screen if the bed's calculations were successfully deleted.
Create a Stressing Calculations Report
From the Stressing Calculations details screen (Figure 4):
- Click the Report button (green box in Figure 4). A pdf report of the stressing calculations will be generated and downloaded.
Create a Tensioning Record
From the Stressing Calculations details screen (Figure 4):
- Click the Create Tension Record button (yellow box in Figure 4).
- A green success message will appear at the top of the screen if the tensioning record was successfully generated.
- Click the Report button (green box in Figure 4). A pdf report of the stressing calculations will be generated and downloaded. The second page of the pdf is the tensioning record.
Delete a Tensioning Record
From the Stressing Calculations details screen (Figure 4):
- Click the Delete Tension Record button (yellow box in Figure 4 - button name if the record was created).
- A green success message will appear at the top of the screen if the tensioning record was successfully deleted.
Was this article helpful?
That’s Great!
Thank you for your feedback
Sorry! We couldn't be helpful
Thank you for your feedback
Feedback sent
We appreciate your effort and will try to fix the article