Purpose
The Job Itemized Tracking screen is used to capture, track, and monitor job-specific costs or quantities.
It allows users to:
- Enter non-production job costs (e.g., outsourced engineering, rentals, specialty services)
- Track budgeted vs. actual amounts at a detailed item level
- See real-time percent complete and remaining budget
- Maintain an audit trail of individual transactions
*Note – You must set up the Itemized Items configuration screen before using Job Itemized Tracking. Link below.
https://helpdesk.concretevision.com/support/solutions/articles/11000135257-itemized-items-configuration
Accessing The Screens
The Job Itemized Tracking screen can be accessed in 2 locations.
- Job Information Page > Documents Tab > Job Itemized Tracking Tab
- Jobs > Project Documents > Job Itemized Tracking Tab (Recommended) This screen allows you to see all jobs and their progression.
Job Itemized Tracking Entry
Step 1: Enter the Itemized Item to be tracked.
This step creates an Item header in the Job Itemized Tracking table to log transactions against.
Important: Items must already be configured on the Itemized Items screen before they appear in the dropdown menu.
- Select an Itemized Item | Category from the dropdown (green box in Figure 1). This will be a Item Header.
- Add an Estimated Amount for that item. Can be added before or after the item to be tracked.
- Click the + button (green arrow in Figure 1).
The newly created Item info will display as white text on a blue background (Figure 1).
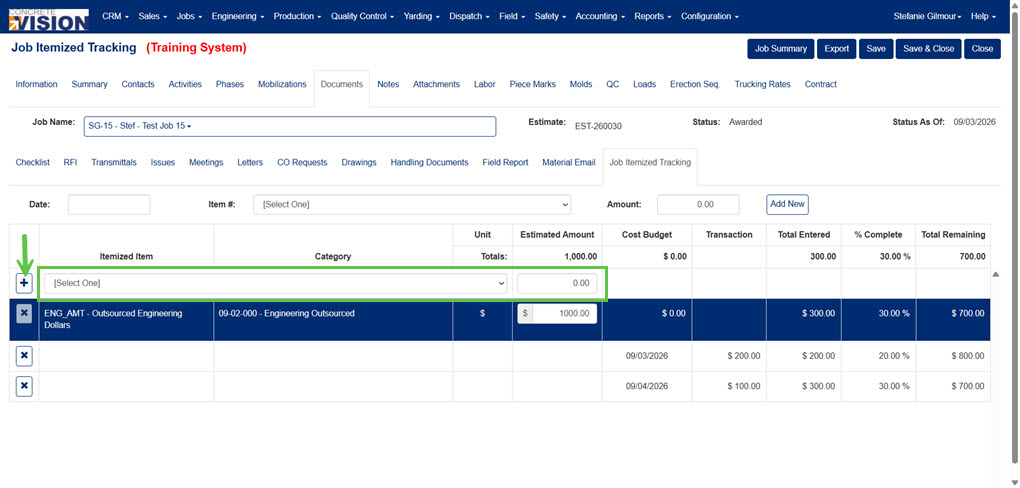
Figure 1
Step 2: Enter Transactions
Enter transactions (yellow box in Figure 2) against the Itemized Item Header set up in Step 1.
- Enter Date (yellow box in Figure 2) the cost or quantity is incurred. Typically matches the invoice date or work date.
- Select Item # from dropdown (yellow box in Figure 2) this transaction should be logged under.
- Enter quantity or dollar amount (yellow box in Figure 2). Example: Engineering Hours → enter number of hours, Rental → enter dollar amount
- Click the Add New button (yellow arrow in Figure 2) to add the entry.
The logged transaction(s) will appear under the selected Itemized Item Header (purple box in Figure 2). The system immediately updates totals and percentages.
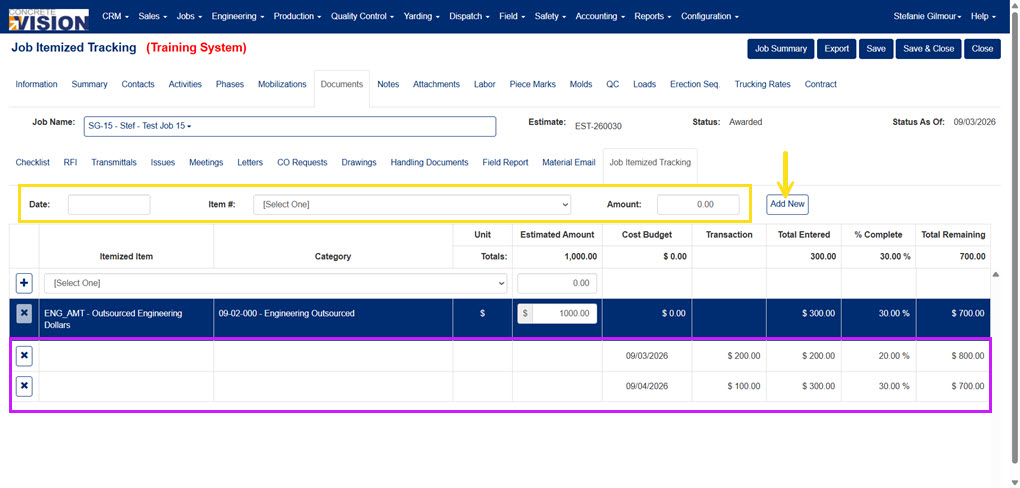
Figure 2
Delete a Job Itemized Tracking Header or Entry
From the Job Itemized Tracking screen:
- Click the Delete icon (red box in Figure 3).
- Click the Ok button in the popup to confirm deletion.
Note: An Itemized Item header cannot be deleted if a transaction is logged beneath it.
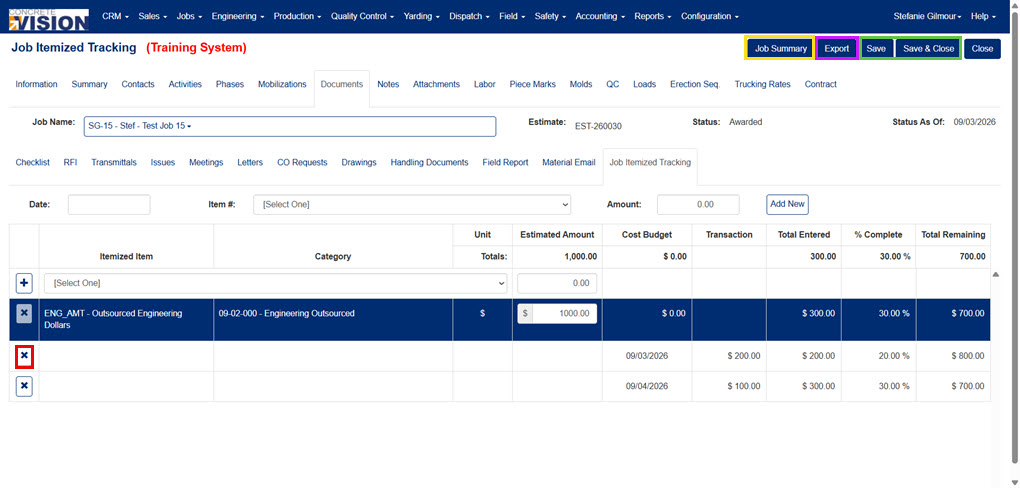
Figure 3
Reports
Spreadsheet exports are available from the Job Itemized Tracking screen.
Job Summary
The Job Summary is a spreadsheet containing the totals and percentages from the Itemized Item headers. To download:
- Click on the Job Summary button (yellow box in Figure 3).
Export
The Export is a spreadsheet containing the itemized transactions logged on the Job Itemized Tracking screen. To download:
- Click on the Export button (purple box in Figure 3).
Common Use Cases
- Track outsourced services not tied to production
- Monitor rental equipment costs
- Capture lump-sum or invoice-based charges
Was this article helpful?
That’s Great!
Thank you for your feedback
Sorry! We couldn't be helpful
Thank you for your feedback
Feedback sent
We appreciate your effort and will try to fix the article