Accessing the Screen
Navigate to Quality Control > Production NCRs from the main menu (Figure 1).
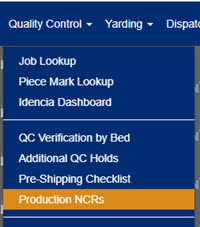
Figure 1
Production / Field NCRs in the Jobs Module
Production NCRs and Field NCRs can also be viewed via Jobs > Production/Field NCRs with the following differences:
- Production NCRs cannot be created in the Jobs module.
- Only production NCRs in the Project Manager Review status can be viewed in the Jobs module.
- A production NCR cannot be converted to a field NCR in the Jobs module.
- Editing a production NCR is limited in the Jobs module.
Using the Production NCRs Screen
The Production NCRs screen (Figure 2) allows Quality Control to edit, add, or search for production NCRs in Concrete Vision.
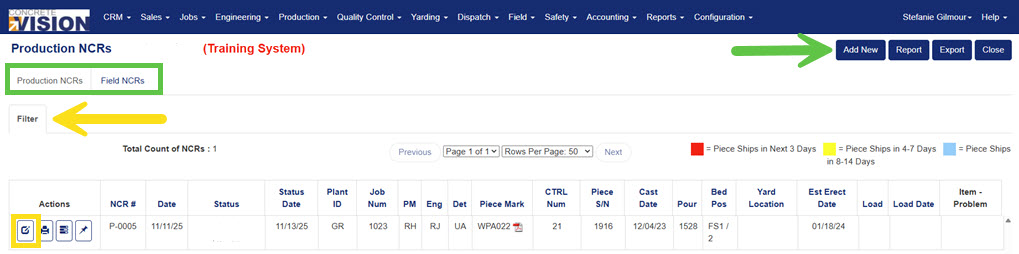
Figure 2
NCR Table Column Descriptions
| Column | Description |
|---|---|
| NCR # | NCR Number |
| Date | Date the NCR was created |
| Status | Current status of the NCR (e.g., New NCR). |
| Status Date | Date of most recent status update |
| Plant ID | Plant ID where Piece Mark was produced. |
| Job Num | Job number the NCR is assigned to. |
| PM | Initials of the Project Manager assigned to the job. |
| Eng | Initials of the Engineer assigned to the job. |
| Det | Initials of the Detailer assigned to the job. |
| Piece Mark | Piece Mark name and drawing. Click the PDF icon to view the drawing. |
| CTRL Number | Control number associated with the Piece. |
| Piece S/N | Piece Mark serial number. |
| Cast Date | Date the piece is poured. |
| Pour | Pour number of piece mark. |
| Bed Pos | Bed position where piece mark was poured. |
| Yard Location | Where piece mark is located in the yard. |
| Est Erect Date | Estimated erection date for the piece. |
| Load | Load number for the piece. |
| Load Date | Load date of the piece. |
| Item - Problem | Specific issue for the NCR. Configurable in the Configuration module. |
NCR Status Color Key
If an NCR fits into one of the status’ described above the table, the row will be highlighted the color denoted in the key:
- Blue for Pieces shipping in 8-14 days
- Yellow for 4-7 days
- Red for within the next 3 days
Switching between Production NCRs and Field NCRs
To toggle between Production NCRs and Field NCRs, navigate to the top left of the Production NCRs screen and select the appropriate tab corresponding to the desired NCR type. (Green box, Figure 2).

Figure 3
Filtering the Production NCR List
Use the Filter tab (yellow arrow, Figure 2) to locate specific NCRs
- Click on the Filter tab.
- Select the filter criterial such as Job Name, Project Contact, NCR Item, and NCR Problem.
- Click the Search to apply filter.
NOTE: The filter default of NCR status on the Production NCRs screen includes New NCR, QC Review, and Final QC Review selected. Use the filter's Clear button to view NCRs with additional statuses.
Sorting the Production NCRs List
Sort the list of NCRs using the blue headings in the NCR table.
- Click the heading of the column you wish to sort by.
- Click the same heading again to change the direction of the sort (ascending vs. descending).
Viewing Piece Mark Drawings
To view the piece mark drawing attached to an NCR, click the PDF icon in the Piece Mark column of the table.
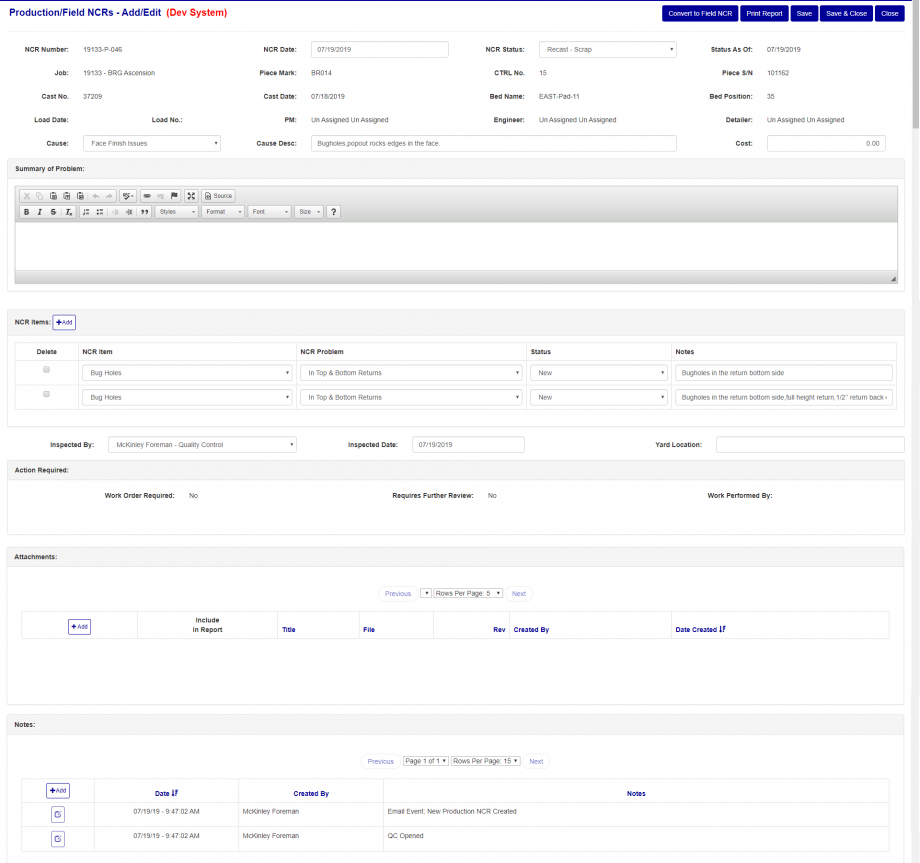
Figure 4
Create A New Production NCR
There are 4 ways to create a new NCR, but this example uses the Production NCRs screen. The other ways are listed near the end of this article. To create a New Production NCR:
- Click on the Add New button (green arrow in Figure 2). The Production/Field NCRs - Add/Edit screen will load (Figure 4).
- Select the job from the Job dropdown.
- Select the piece from the Piece Mark dropdown.
- Fill in applicable fields for the NCR.
- Click the Save button to save the record, or the Save & Close button to save and return to the Field NCR list.
Note: To be able to save the Production NCR, a job and a piece mark must be selected or an error will display {Figure 5).
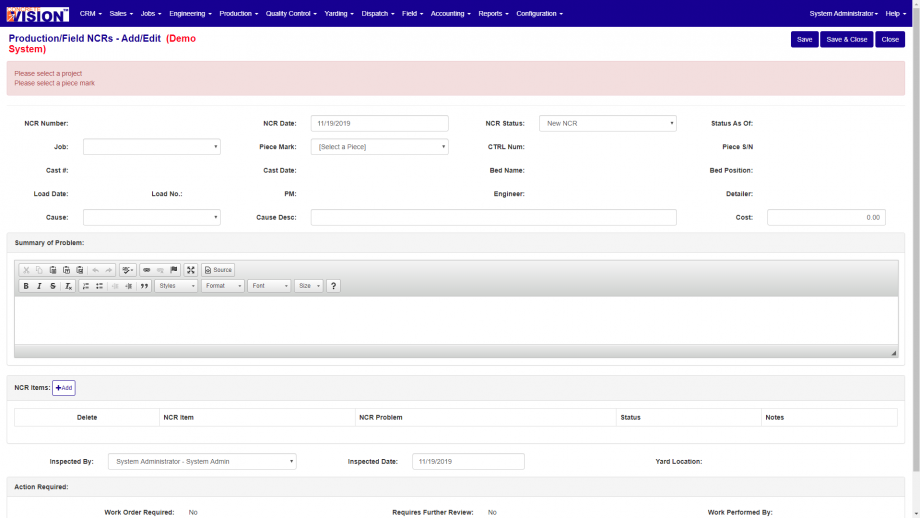
Figure 5
Editing a Production NCR
With the Production NCR tab selected:
- Locate and click on the Edit icon of the existing Production NCR to edit from the list on the Production NCRs screen.
- On the Production/Field NCRs - Add/Edit screen, navigate to the NCR details section, modify the Status associated with the NCR as needed.
- In the Action Required text field, update the corrective action and modify the Work Order Required, Requires Further Review, and Work Performed By fields as needed.
- In the Attachments section, add pictures/attachments as needed.
- Click the Save button to save changes or the Save & Close button to save changes and close the screen.
NCR Statuses
An NCR moves through a defined set of statuses that control workflow routing. The table below describes each status and the transitions it allows.
| Status | Workflow Notes |
| New NCR | Starting status. Can be moved to any other status. |
| Drafting Review | Can only move to Engineering Review, PM Review, or QC Review. |
| Engineering Review | Can only move to Drafting Review, PM Review, or QC Review. |
| PM Review | Can only move to Drafting Review, Engineering Review, or QC Review.. |
| QC Review | NCR has been reviewed and is awaiting assignment to a repair department. |
| Production Repair | Can only move to QC Review or Final QC Review. |
| Steel Shop Repair | Can only move to QC Review or Final QC Review. |
| Finishing Repair | Can only move to QC Review or Final QC Review. |
| Final QC Review | NCR is back from repair and ready for final review. |
| Repair Complete | Repair has been completed. |
| Recast - Scrap | Piece mark has been scrapped and will be recast. |
| Recast - Stock | Only applies to product categories marked as Hollowcore. |
| Repair Not Needed | NCR is closed without requiring repair. |
| Complete Without Repair | NCR is marked complete without any repair being performed. |
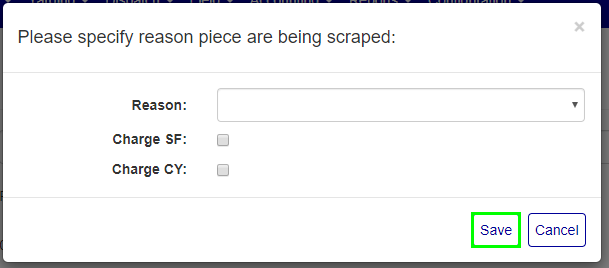
Figure 6
Recast - Scrap Status Steps
When you change the status of the NCR to Recast - Scrap, a window will open (Figure 6) to collect more details.
- Select a reason for the scrap.
- Mark checkbox to charge for the SF of material scrapped.
- Mark checkbox to charge for the CY of material scrapped.
- Click the Save button.
Printing Report of Filtered Production & Field NCR List
- Use the Filter tab (Yellow arrow, Figure 2) to adjust the displayed NCR list as needed.
- Click the Report button (Green box, Figure 2) in the top right of the screen.
Note: A report can be generated for a single NCR by clicking the Printer icon beside the specific NCR number.
Exporting Filtered Production NCR & Field List
- Use the Filter tab (Yellow arrow, Figure 2) to adjust the displayed NCR list as needed.
- Click the Export button (Orange box, Figure 2) in the top right of the screen.
NOTES:
**The Different Ways to Create an NCR
- Engineering via Engineering > Production/Field NCRs Screen
- From the Post-Pour Checklist
- Quality Control via Quality Control > Production NCRs Screen
- From a Field NCR
Was this article helpful?
That’s Great!
Thank you for your feedback
Sorry! We couldn't be helpful
Thank you for your feedback
Feedback sent
We appreciate your effort and will try to fix the article