Overview
This article contains information on the project takeoff and estimate within a proposal. Both the project takeoff and estimate in Concrete Vision are parts of the sales proposal for an opportunity.
- A Project Takeoff counts and lists every piecemark, material, and resource needed for the project.
- A Project Estimate lists estimated costs for every piecemark, material, and resource needed for the project.
Import an Estimate
Estimates can be imported via the Project Estimate Import screen, accessed via the Import Estimate button (orange box in Figure 6). Here is the full article on importing estimates in Concrete Vision.
Required Configuration / Setup
Before creating a takeoff and estimate from scratch within Concrete Vision, data must be entered in the following module screens. If importing estimate takeoff values from the Excel import template, configuration of these modules are NOT necessary.
Configuration Module > Accounting Setup
- Unit Types
- General Ledger Code Types
- General Ledger Codes
- Estimate Headers
- Estimate Summary Group
- Estimate Sections
Configuration Module > Sales Setup
Accounting Module
Accessing the Project Takeoffs Screen
- Visit Sales > Estimate / Proposal Lookup from the main menu (Figure 1) to view the Estimate / Proposal Lookup screen (Figure 2).
- Select the Edit button beside the estimate number (green box in Figure 2).
- On the Sales - Proposals screen, select the Bids Tab (yellow box in Figure 3) containing the takeoff.
- Click on the View Takeoff button (green box in Figure 3) to load the Project Takeoffs screen.
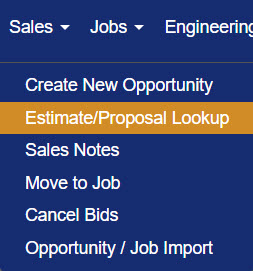
Figure 1
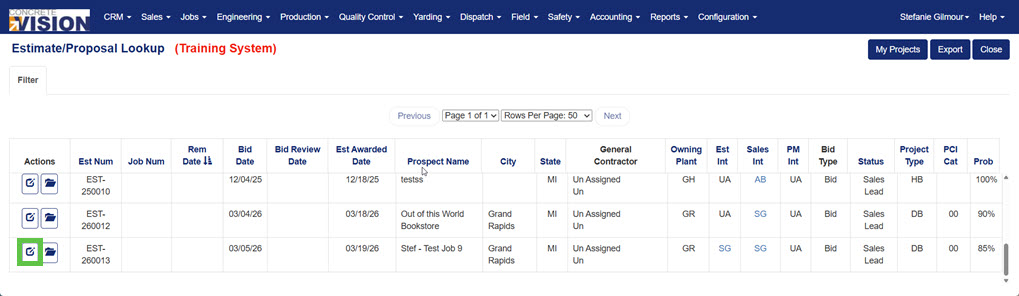
Figure 2
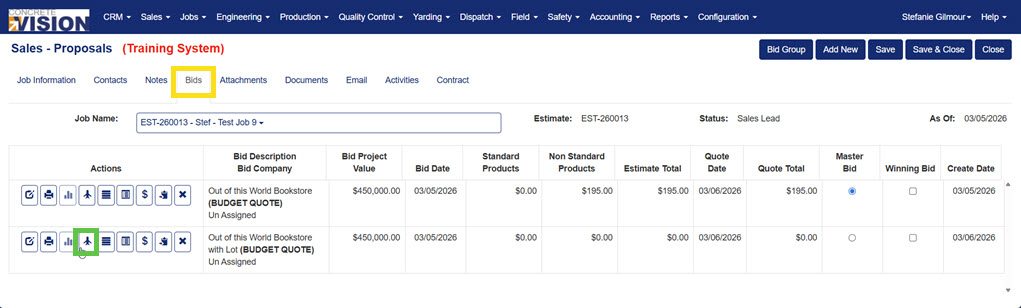
Figure 3
How to Create a Project Takeoff
On the Project Takeoffs screen (Figure 4), complete the required fields (yellow box in Figure 4).
- Select the plant Location.
- Select the product Category.
- Select the Product code.
- Enter Number of takeoff lines to create with this combination of fields.
- Click the Add button (green box in Figure 4)
The new Takeoff will be listed in the table (Figure 5). Multiple Takeoffs can be listed on this screen.
Note: The Number field refers to the quantity of takeoff lines for that combination of plant Location / product category / product code, not the quantity of products.
How Takeoff Affects the Estimate
If the Required Configuration / Setup section at the beginning of this article is complete, adding the Project Takeoff lines will automatically create and pull the item cost values assigned to those takeoff lines into the proposal's estimate.
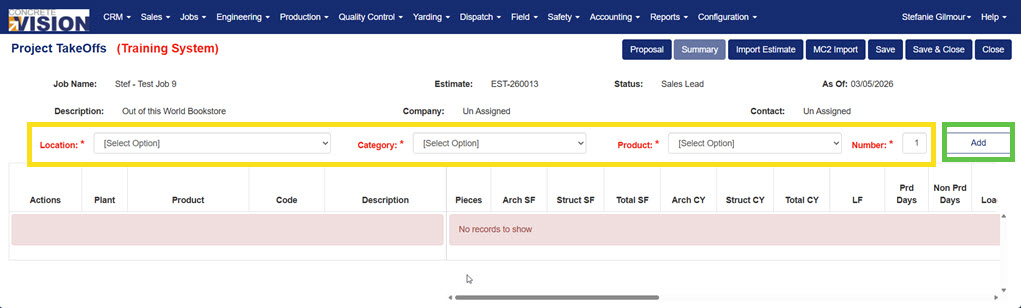
Figure 4
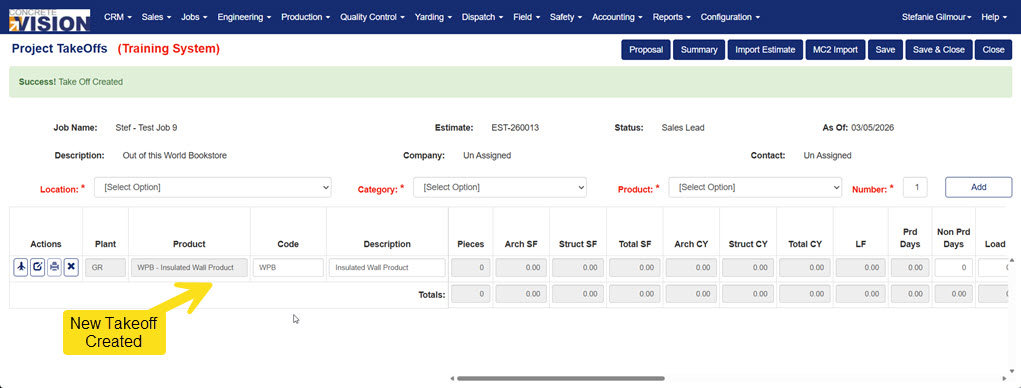
Figure 5
Edit Takeoff Details
From the Project TakeOffs screen (Figure 6):
- Click the Takeoff icon (green button in Figure 6). The Project Takeoff screen (Figure 7) for that specific takeoff line will load.
- Edit any needed field (yellow box in Figure 7).
- Add needed mark numbers, quantity of pieces, or other piece details by filling in available fields (green box in Figure 7) and clicking the Plus button (green arrow in Figure 7).
- Edit any mark numbers, quantity of pieces, or other piece details by adjusting available fields of listed items.
- Click the Save button to save the info or the Save & Close button (orange box in Figure 7) to save the info and return to the Project TakeOffs screen (Figure 6).
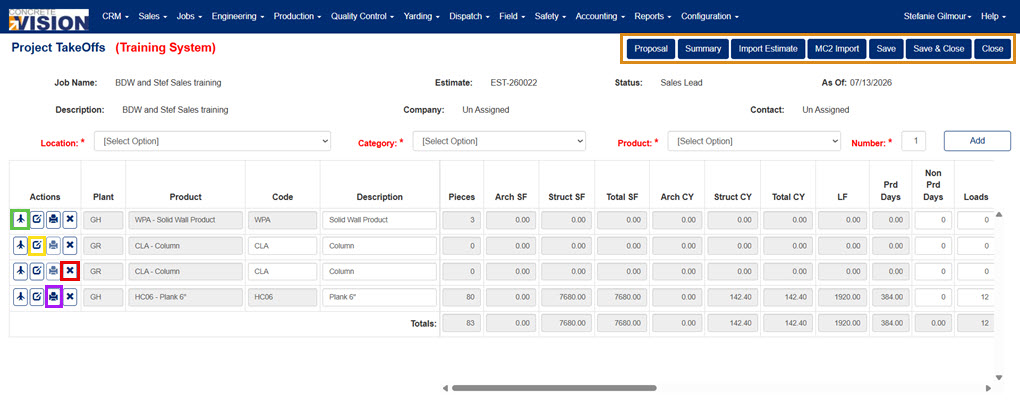
Figure 6
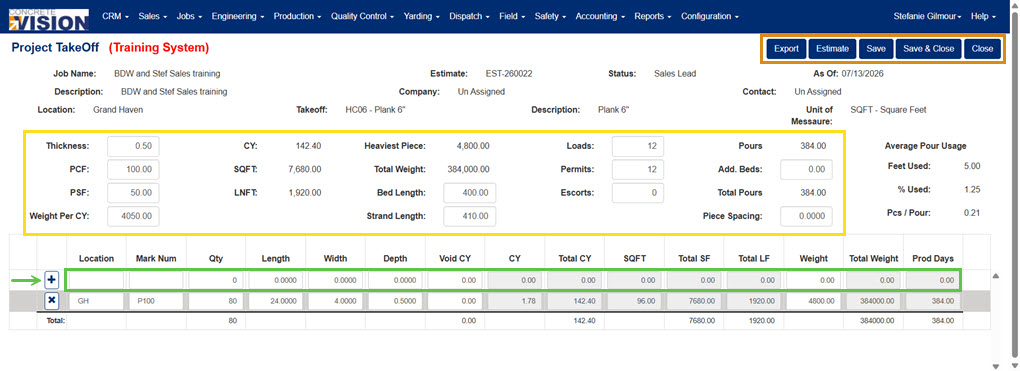
Figure 7
Delete Takeoff Line
From the Project TakeOffs screen (Figure 6):
- Click the Delete icon (red square in Figure 6).
- Click the Okay button in the popup window to confirm deletion.
Managing Estimates
There are numerous ways to create estimates in Concrete Vision. Clients should select a method that fits their company’s workflow. Creating estimates can be done by:
- Creating a takeoff and have estimate details automatically added. Note: CV must be configured for this option. See Setup / Configuration requirements at beginning of this article.
- Importing estimate values with an Excel template (How-to in the Import Estimate - Excel article.)
- Building estimate manually by individually adding each cost item. (not advised)
Print Estimate
From the Project TakeOffs screen (Figure 6):
- Click the Print icon (purple square in Figure 6).
- An estimate of that specific takeoff line will be generated as a pdf.
Note: The Print icon will be inactive on takeoff lines where no items exist in the takeoff or estimate.
Edit Estimate Details
From the Project TakeOffs screen (Figure 6):
- Click the Edit icon (yellow box in Figure 6). The Estimate screen (Figure 8) for that specific takeoff line will load.
- Edit any needed field.
- Add or edit any needed mark numbers, quantity of pieces, or other piece details.
- Click the Save button to save the info or the Save & Close button (orange box in Figure 7) to save the info and return to the Project TakeOffs screen (Figure 6).
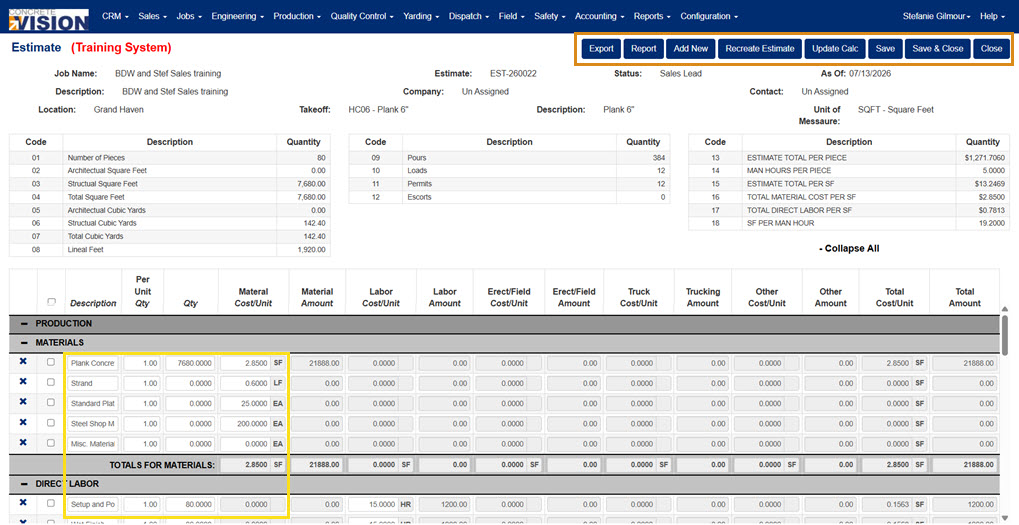
Figure 8
Add New Estimate Items
From the Estimate screen (Figure 8):
- Click the Add New button (orange box in Figure 8). The Estimate - Add New screen will display (Figure 9).
- Check the box of any additional items that should be added to the estimate (green box in Figure 9). The bottom half of the screen scrolls (yellow arrow in Figure 9).
- When needed items are selected, click the Save button to save the info or the Save & Close button (red box in Figure 9) to save the info and return to the Estimate screen (Figure 8).
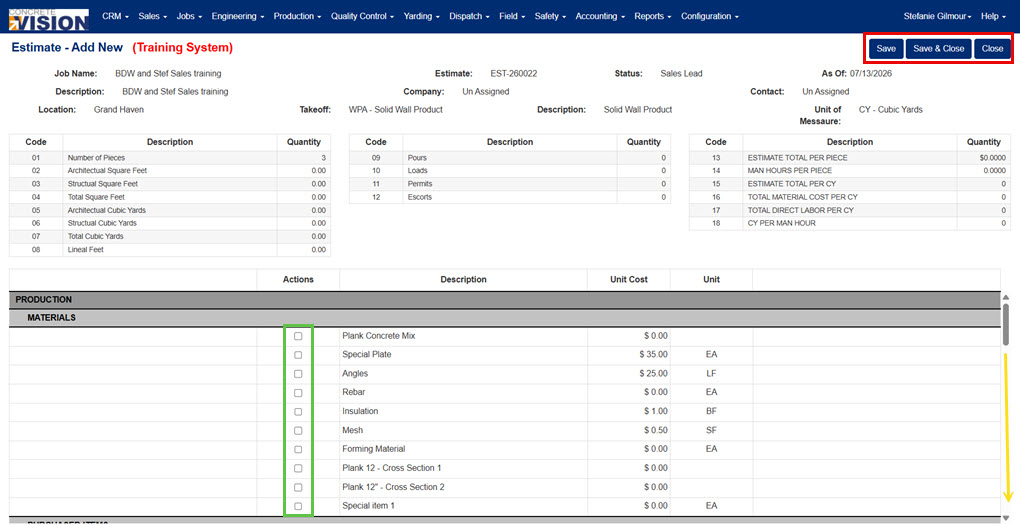
Figure 9
Was this article helpful?
That’s Great!
Thank you for your feedback
Sorry! We couldn't be helpful
Thank you for your feedback
Feedback sent
We appreciate your effort and will try to fix the article