Overview
The Yard Location Setup screen builds and replicates a plant's yard in Concrete Vision so pieces can be yarded in the Assign Yard Locations screen.
Accessing the Screen
Navigate to Yarding > Yard Location Setup from the main menu (Figure 1).
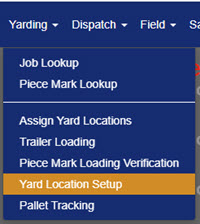
Figure 1
Using the Yard Location Setup Screen
The Yard Location Setup screen (see Figure 2) is used to add, edit, and view a plant's yard locations.
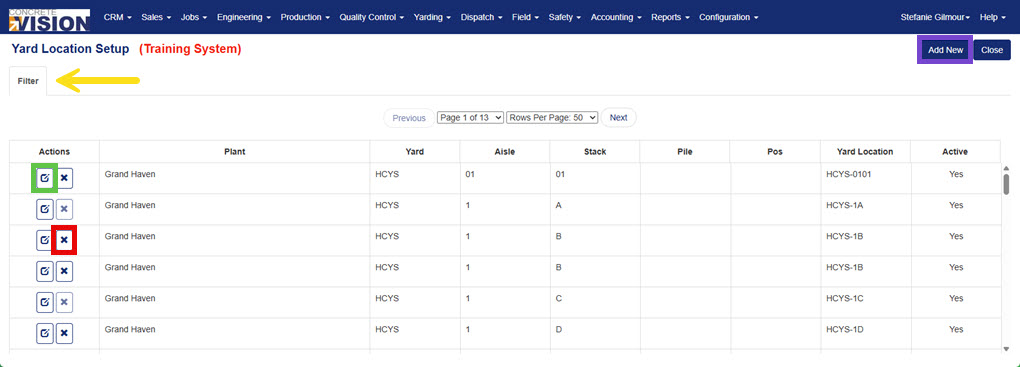
Figure 2
Add a New Yard to a Plant
- Click on the Add New button (purple box in Figure 2).
- In the next screen (Figure 3), select a plant from the dropdown.
- Name the yard.
- Enter an aisle (a row within the yard). Multiple aisles can be added in the Aisle field, separated by commas.
- Enter a stack (a space within the aisle). Multiple stacks can be added in the Stack field, separated by commas.
- Enter a pile (optional).
- Click the Save button (green box in Figure 3) to save the information or the Save & Close Button (red box in Figure 3) to save the information and return to the main Yard Location Setup screen.
Yard Addition Example: To add a yard named "EAST" with 2 aisles and 4 stacks within each aisle:
- Yard: EAST
- Aisle: A,B
- Stack: 01,02,03,04
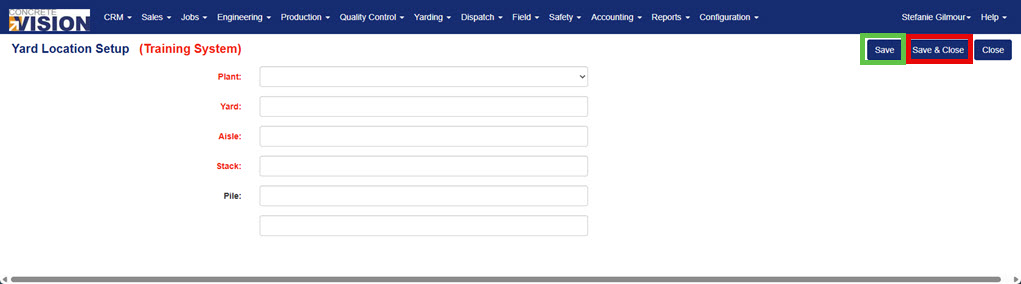
Figure 3
Add New Yard Locations to an Existing Yard
- Click on the Add New button (purple box in Figure 2).
- In the next screen (Figure 3), select a plant from the dropdown.
- Type in the existing Yard name where new locations will be added.
- Enter any additional aisles.
- Enter any additional stacks.
- Enter any additional piles.
- Click the Save button (green box in Figure 3) to save the information or the Save & Close Button (red box in Figure 3) to save the information and return to the main Yard Location Setup screen.
Edit a Yard Location
- Click on the Edit icon (green box in Figure 2) next to the yard location to remove.
- On the popup screen, confirm the deletion by clicking the Okay button.
- Click the Save button (green box in Figure 3) to save the information or the Save & Close Button (red box in Figure 3) to save the information and return to the main Yard Location Setup screen.
Remove a Yard Location
- Click on the Delete icon (red box in Figure 2) next to the yard location to edit.
- In the next screen (Figure 3), make any needed edits.
NOTE: A yard location with a piece assigned to it cannot be removed.
Filter Assign Yard Locations
- Click the Filter tab (yellow arrow in Figure 2) to open the filter menu (Figure 4) to search for specific results
- Enter, change, and select any of the inputs/items to obtain specific results or fewer.
- Click the Search button (green box in Figure 4).
- To clear/reset a current filter click the Clear button (red box in Figure 4).
- To re-generate the table using the filter click the Search button.
- To close/hide the filter press the Filter tab again.
NOTE: Searching and clearing the filter leaves the current screen, so save all changes beforehand.
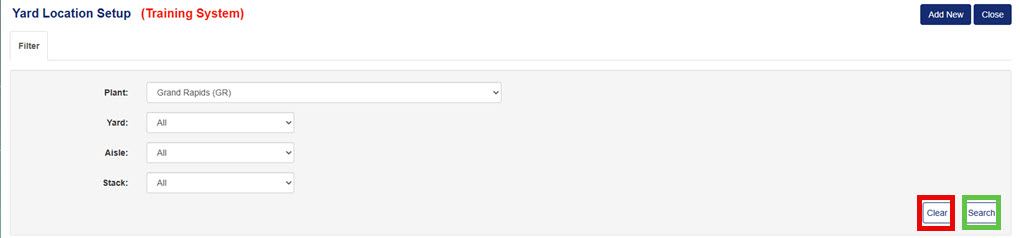
Figure 4
Was this article helpful?
That’s Great!
Thank you for your feedback
Sorry! We couldn't be helpful
Thank you for your feedback
Feedback sent
We appreciate your effort and will try to fix the article