Overview
If a bid on an opportunity is built outside of Concrete Vision, it can be imported into the Sales module through takeoff.
Accessing the Screen
1. Navigate to Sales > Estimate / Proposal Lookup from the main menu (Figure 1).
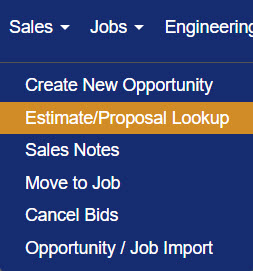
Figure 1
2. Locate the Estimate number and click the Edit icon (green box in Figure 2).
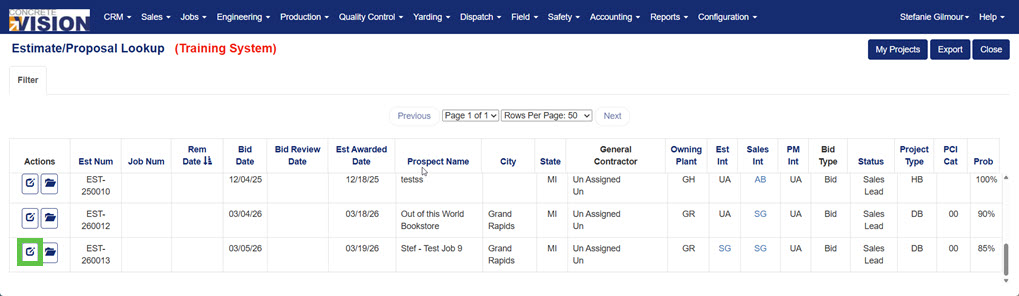
Figure 2
3. From the Sales - Information screen, click the Bids tab (yellow box in Figure 3). The Sales - Proposals screen will load.
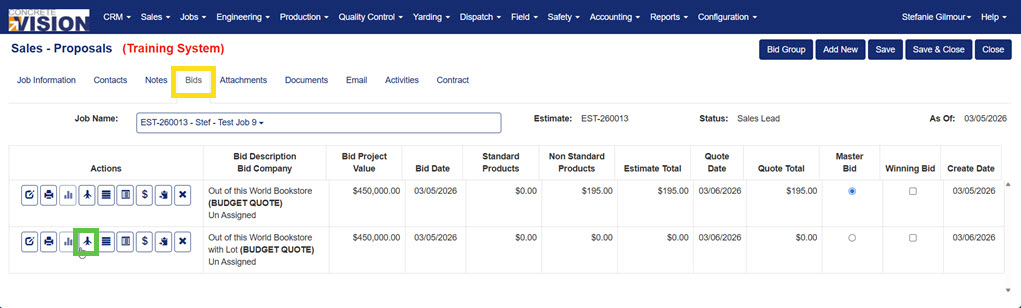
Figure 3
4. Click the Takeoff icon (green box in Figure 3) next to the bid that will include the imported estimate. The Project - Takeoffs screen (Figure 4) will load.
Importing an Estimate into Takeoff
Estimates can be manually built in Concrete Vision or imported into takeoff from the Project - Takeoffs screen (Figure 4) by using a provided Excel template.
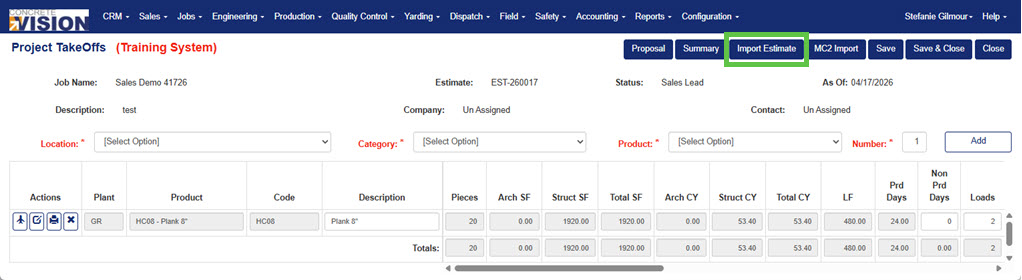
Figure 4
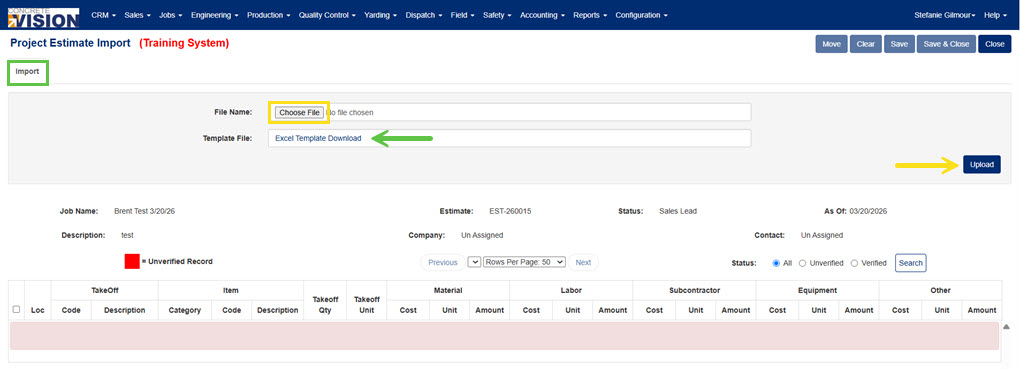
Figure 5
Download the Estimate Template
- Click the Import Estimate button (green button in Figure 4) in the upper right of the screen. The Project Estimate Import screen (Figure 5) will load.
- Click the Import tab (green box in Figure 5).
- Click the Excel Template Download link (green arrow in Figure 5) to download the excel template needed for importing estimates into Concrete Vision.
- Fill out the Excel template, using the below table for guidance.
Complete the Estimate Template in Excel
| Column Name | Data Type | Description | Location in CV |
|---|---|---|---|
| Loc ID | Text | Plant location ID. | Config > System Setup > Company Locations |
| Takeoff Code | Text | Product Number | Configuration > Product Codes |
| Takeoff Desc | Text | Product Description | Configuration > Product Codes |
| Category | Text | Accounting category | Accounting > Categories |
| Item Code | Text | Accounting item code | Accounting > Inventory > Item Setup |
| Item Description | Text | Accounting item description | Accounting > Inventory > Item Setup |
| Takeoff Qty | Decimal | Takeoff quantity. If left blank, default to 0. | |
| Takeoff Unit | Text | Item takeoff unit. | Accounting > Unit Types |
| Material Cost | Decimal | Item material cost per unit. | Accounting > Inventory > Item Setup |
| Material Unit | Text | Unit of measure for material. | Accounting > Unit Types |
| Material Amt | Decimal | Item material amount. | Material Cost x Takeoff Qty |
| Labor Cost | Decimal | Item labor cost per unit. | Accounting > Inventory > Item Setup |
| Labor Unit | Text | Unit of measure for labor. | Accounting > Unit Types |
| Labor Amt | Decimal | Item labor amount. | Labor Cost x Takeoff Qty |
| Sub Cost | Decimal | Item sub cost per unit. | Accounting > Inventory > Item Setup |
| Sub Unit | Text | Unit of measure for subcategory. | Accounting > Unit Types |
| Sub Amt | Decimal | Item sub amount. | Sub Cost x Takeoff Qty |
| Equip Cost | Decimal | Item equipment cost (trucking) per unit. | Accounting > Inventory > Item Setup |
| Equip Unit | Text | Unit of measure for equipment. | Accounting > Unit Types |
| Equip Amt | Decimal | Item equipment amount. | Equipment Cost x Takeoff Qty |
| Other Cost | Decimal | Item other cost (overhead, SGA, profit) per unit. | Accounting > Inventory > Item Setup |
| Other Unit | Text | Unit of measure for other. | Accounting > Inventory > Item Setup |
| Other Amt | Decimal | Item other amount. | Other Cost x Takeoff Qty |
NOTE: If a Cost cell is left blank, it will be calculated if Takeoff Qty and Amount are entered. If an Amount cell is left blank, it will be calculated if Takeoff Qty and Cost are entered.
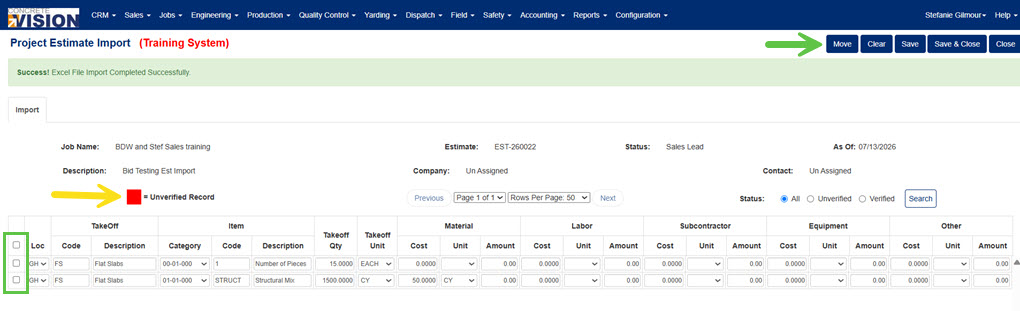
Figure 6
Import the Estimate Template & Move Estimate Items into CV
After the estimate template is completed, it is uploaded on the Project Estimate Import screen (Figure 5).
- Click the Choose File button (yellow box in Figure 5) on the Project Estimate Import screen.
- Select the completed Excel template file.
- Click the Upload button (yellow arrow in Figure 5). If the file uploads successfully, a success message appears in a green band under the page title (Figure 6).
- Mark the checkbox (green box in Figure 6) beside the estimate items to move into CV.
- Click the Move button (green arrow in Figure 6) to complete the import process. The data will drop off the import screen, and a "Record Successfully Inserted" message will appear in the green band under the page title.
NOTE: If any fields have errors after the file upload, CV will outline them in red (yellow arrow in Figure 6) as an unverified record. Correct flagged errors before moving the estimate data into CV.
Using the Excel Template with an In-House Excel Estimating Workbook
If there is an Excel workbook used in-house for estimating, the Excel Estimate Template can be placed within that workbook. VLOOKUP can be used to place data into the correct columns in the Excel Estimate Template. As long as the workbook maintains a tab name of "Data," only the information on "Data" will be imported into Concrete Vision.
Integration Requirements
- The column headings must remain unchanged.
- The tab for the estimate template must have the name of "Data."
Was this article helpful?
That’s Great!
Thank you for your feedback
Sorry! We couldn't be helpful
Thank you for your feedback
Feedback sent
We appreciate your effort and will try to fix the article